Thought I'd share my first ever tutorial!
I got the idea for a post box/post organiser when I saw that another blogger had made one. Hers was black with some blue polka ribbon around the top, and even though I've spent hours looking through the blogs to try and find the link I can't find it anywhere. I'm sure I'm not going mad, so if you see it, please let me know so I can link it!
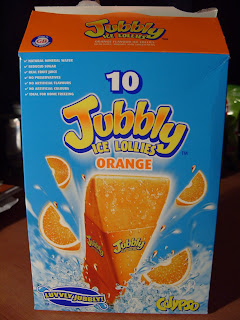
So to begin with I needed a box. Seeing as I'd just bought these I decided that it would be a good enough size, and relatively sturdy too.
(Oh, and if you haven't tried them, try them).
To begin with I cut the side off the box. That way it wouldn't be too high and more likely to topple over. And it can hold bigger sized envelopes. I stuck the end I'd opened closed using double sided tape.
This is what it looked like. I tidied up some of the edges to make it neater.

I had some acrylic paint left over from a paint-your-own canvas pack I picked up last year. I hoped the white would be thick enough to cover the box seeing as it's a pretty thick consistency.
As it was it still looked like this after 2 coats. It was a little better after the third, but not much. I used up all my paint and it still looked crap. Not good.
I ate one while I tried to think about what to do next.

In the end I found some white paper I had already. I used double sided tape to attach it all the way around the box, and folded the underneath like wrapping a present. Unfortunately I forgot to take a picture of the box once it was done, but it looked a lot whiter.
It was a little on the thin side so I went and bought some patterned tissue paper in WHSmith (which I didn't realise they did). Two of my friends gave me presents wrapped in a similar patterned paper for my birthday, but I couldn't track it down anywhere. This was the closest I could find.
I wrapped the whole box in the tissue paper, and attached it using double sided tape again.
The insides aren't amazingly neat as I didn't want to trim the paper. It's pretty thin, and awkward to get your scissors and hands inside the box.
And here's the finished box :)
I'm pleased with it. It didn't show any sign of toppling over which was my main worry. So that's a good thing. And it fits in with the room well. The table it sits on is normally covered in post (downside of living in a shared house) so now it's a lot neater, and the room looks better.
It also goes pretty well with the paint decor, which as you can see is a pretty strong colour and hard to match to! (Please excuse the sloppy photoshop work!)
Hope that's easy enough to follow, I kinda made it up as I went along!
xx
I'm linking to:


3 comments:
I love using unexpected items for cute crafts. Love yours. I did something similar with a pizza box for scrapbook paper. So unexpected. Looks lovely. Found you at My Craftie Life party.
creationsbyladeeda.blogspot.com
Black and white! My favorite. Cute! you should link this up to my upcycled Awesome linky party! http://tinyurl.com/Upcycled7
I hate paper and mail being all over my house! This is such a great idea! Thanks for linking over at My Craftie Life. I hope to see other projects soon.
Post a Comment